
 To a preservation novice like myself, a split board or rotted wood can be quite an obstacle. But armed with the motivation to learn and preserve, anyone can learn the techniques to maintain their historic homes.
As I alluded to in the previous post, I repair wood first and replace as a last resort. This is the stuff I use – from a company called Abatron – LiquidWood® and WoodEpox®.
There are other manufacturers of wood consolidant and filler, which I’m sure work well, but these are the only products I’ve used.
I gained the knowledge of how to use these products by visiting this website HistoricHomeWorks, watching instructional video on the site and purchasing the how to preservation reports Saver Your Wood Windows and Wood-Epoxy Repairs. John Leeke, American Preservationeer, hosts the website and authors these educational materials.
I’ve corresponded with John recently and New Albany may be lucky enough to get a visit from him next May during preservation month.
Application Examples from recent weekends on the job ----
First is a whopper of a nail hole with rot all around it.

I whip out some wood consolidant (LiquidWood®) to apply to the area of a decaying wood.
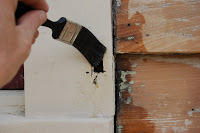
This stuff penetrates and regenerates the wood. It’s a two part liquid epoxy product – mix equal parts and apply with a brush or pour on the area of need. In one to six hours, the wood is hard as rock and the hole is ready to be filled.
Next I had to address a chunk of missing wood in the crown molding (thanks a lot vinyl siding installers).
Next I had to address a chunk of missing wood in the crown molding (thanks a lot vinyl siding installers).

This gets filled with WoodEpox®, a two part epoxy. It’s the same concept as the consolidant – combine the two parts in equal volume, mix and apply.
 It’s the consistency of play-doh and easy to work with. It also smells like a biscuit when mixed.
 The wood epoxy is not your normal wood filler. It’s shrink free and can be used to replace, repair, fill cracks, cast and sculpted into shapes and machined just like wood when it hardens. It has saved my butt many times.
Next was a gapping hole in the trim of a window. It was fixed with my hammer never leaving the tool belt.


Please visit John’s site for more detailed instruction and don’t hesitate to take on that preservation project you want to do.


No comments:
Post a Comment